Contents
Introduction
The Imaging Toolbox contains many features of use to the astro-imager, whether using your own equipment or a remote observatory.
- View a selection of all-sky image surveys directly from your web browser with no need to install extra software.
- Explore the sky interactively by panning, zooming and dynamically switching between surveys.
- Find almost any deep-sky target by common name or catalogue number (Messier, NGC, ICC, etc.), or choose from a list of popular imaging targets.
- Go to any location using Right Ascension and Declination coordinates.
- Overlay the sky with a reticule which reproduces the field of view of your camera and telescope, choosing from a database of hundreds of popular telescopes, astronomical CCD and DSLR cameras.
- Display multiple reticules at once to compare the fields of view of different camera and telescope / lens combinations. Great for evaluating prospective investments in new equipment!
- Reposition the target and rotate the reticule to work out the best way to frame your image, as well as changing the reticule colour to suit different sky backgrounds.
- Arrange multiple reticules on a single target to plan a mosaic.
- Annotate the reticule with the field of view dimensions, pixel scale and the resolving power of your scope/lens.
- Set the reticule size by directly entering the dimensions of your field of view if you already know them, or calculate them if you don’t.
- Calculate field of view dimensions using camera chip or pixel dimensions, resolution and the focal length of your scope or lens.
- Determine the effect of adding a Barlow lens or focal reducer/field flattener on your set-up.
Instructions
The Imaging Toolbox consists of an interactive sky survey and a series of easy-to-use controls which are explained below.
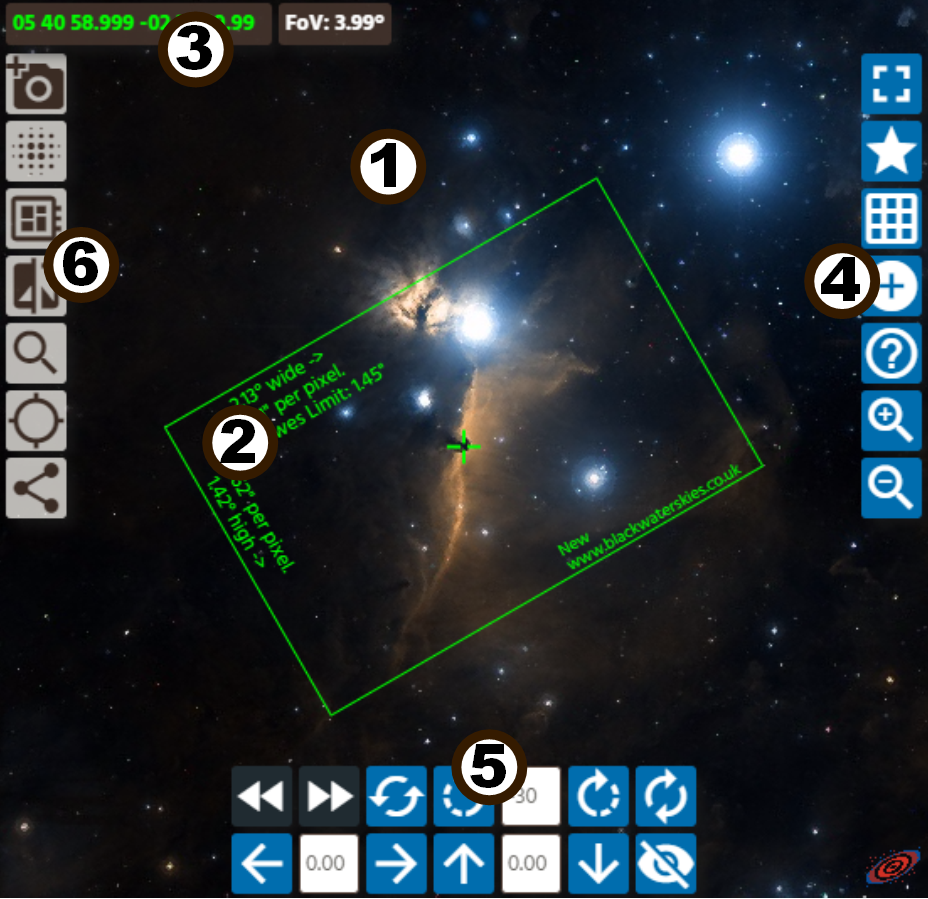
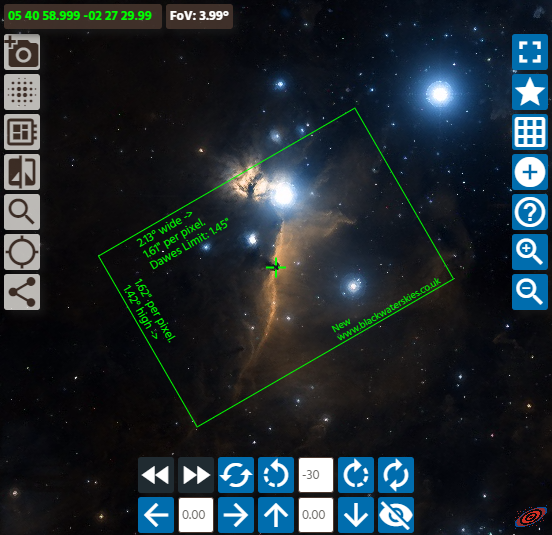
1. Sky Survey: You can pan around the whole sky by clicking/touching and dragging anywhere on the background. You can also zoom in and out using the mouse-wheel or using the zoom controls (pinch-to-zoom is not currently supported on touch devices).
2. Field of View Reticule: The field of view of your camera and telescope / lens combination is shown by the green reticule. The reticule may be annotated to show all or some of:
- The size of the field of view in degrees, both horizontally and vertically.
- The pixel scale of your image in arc seconds per pixel, both horizontally and vertically (if known).
- The Dawes Limit (maximum theoretical resolving power of your telescope or lens) in arc seconds.
- The description of the reticule, as set using the ‘Compare’ controls.
3. RA and Dec / Field of View:
- The RA/Dec coordinates (ICRS/J2000) of the mouse pointer as you move it over the survey is shown at the left (not available on touch devices).
- The horizontal field of view covered by the imaging toolbox.
4. View Controls: Survey display controls, as explained below.
5. Reticule Controls: Reticule display controls, as explained below.
6. Calculators and Other Controls: Controls and forms for calculating the field of view of your equipment, etc.
View Controls
Maximise: Toggle the Imaging Toolbox between normal mode and full screen mode.
Constellations: Toggle display of constellation outlines and names.
Equatorial Grid: Toggle display of the equatorial grid.
Popular Targets: Toggle display of popular target locations (Messier and Caldwell objects)
Help: Display this help page in a new browser tab.
Zoom In: Zoom in the survey view. Note that zooming is disabled if the current reticule is maximised.
Zoom Out: Zoom out the survey view. Note that zooming is disabled if the current reticule is maximised.
Reticule Controls
Previous Reticule: Switch to the previous reticule. See the compare form for instructions on creating multiple reticules. (Greyed out if the current reticule is the first / only one).
Next Reticule: Switch to the next reticule. See the compare form for instructions on creating multiple reticules. (Greyed out if the current reticule is the last / only one).
Rotate Anti-clockwise (Coarse): Rotate the current reticule ten degrees anti-clockwise.
Rotate Anti-clockwise (Fine): Rotate the current reticule one degree anti-clockwise.
Rotation Angle: Enter the desired rotation angle between -180 degrees and +180 degrees.
Rotate Clockwise (Fine): Rotate the current reticule ten degrees clockwise.
Rotate Clockwise (Coarse): Rotate the current reticule one degree clockwise.
Pan Left: Move the current reticule left 0.05 degrees.
Horizontal Offset: Enter the desired horizontal offset in degrees (- is left, + is right).
Pan Right: Move the current reticule right 0.05 degrees.
Pan Up: Move the current reticule up 0.05 degrees.
Vertical Offset: Enter the desired horizontal offset in degrees (- is up, + is down).
Pan Down: Move the current reticule down 0.05 degrees.
Toggle Reticule: Toggle display of the current reticule.
Calculators and Other Controls
Select Equipment: Displays a form which enables you to calculate the field of view of popular telescope and camera combinations.
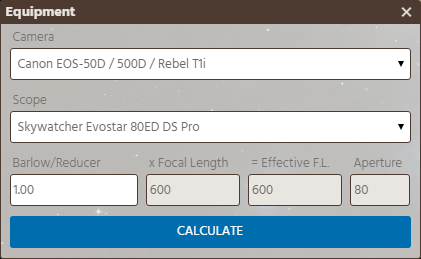
- Select your camera model from the ‘Camera’ list. Many popular makes and models of astronomical CCD and DSLR cameras are listed. Note that where one manufacturer sells multiple cameras with sensors that produce identical fields of view, they may have been grouped together in to a single entry in the list.
- Select your telescope from the ‘Scope’ list. Again, many makes and models popular with astro-imagers are listed. Note that where a manufacturer has marketed the telescope under different names they may have been grouped together in to a single entry.
- If you are using a Barlow lens or a Focal Reducer/Field Flattener, enter the effective magnification (greater than 1) or reduction factor (less than 1) in the ‘Barlow/Reducer’ box. If you aren’t using a Barlow or Reducer, leave this box at the default value of 1. The manufacturer’s quoted magnification/reduction factor is a good starting place, but you may find that you have to adjust it as the effect will depend on the precise spacing to the camera sensor.
- Click the ‘Calculate’ button and the camera’s pixel size, resolution and chip size will be retrieved.
- The scope’s focal length will be retrieved and appear in the ‘Focal Length’ box.
- The effective focal length of the scope will be calculated using the Barlow/Reducer factor, and will appear in the ‘Effective Focal Length’ box.
- The currently selected reticule will be updated to show the calculated field of view.
- Note that the Chip Calculator and Pixel Calculator will also be populated with the values retrieved here.
- If your particular scope or camera is not listed you can manually enter the required values in one of the calculators as explained below. You can also leave a comment on this page asking for your equipment to be added to the list. You will need to provide:
- The manufacturer name.
- The camera or scope model.
- For scopes, the aperture and focal length of the scope, both in mm.
- For cameras, the horizontal and vertical size of one pixel in µm, the horizontal and vertical size of the active imaging area of the chip in mm and the horizontal and vertical resolution of the active imaging area in pixels. Please try to exclude any inactive or optical black areas from the measurements. If you know the make and exact model number of the sensor chip, provide that as well.
- If possible, provide a link to the manufacturer’s specification page or data sheet.
Pixel Size Calculator: Displays a form which enables you to calculate the field of view based on the camera’s pixel size and resolution. You can usually find this information in the camera manual or on the manufacturer’s web site.
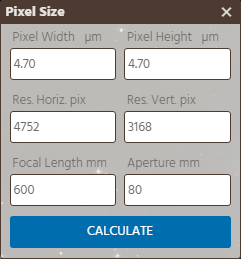
- Enter the size of a single camera pixel in the ‘Pixel Width’ and ‘Height’ boxes in µm.
- Enter the horizontal and vertical resolution of the camera in the ‘Resolution’ boxes in pixels. (For the most accurate results, only include active pixels that appear in the image, leaving out any optical black area).
- Enter the effective focal length of your camera or lens in the ‘Focal Length’ box in mm. You should include the effect of any Barlow or Reducer by multiplying the focal length of the scope by the magnification/reduction factor .
- Enter the aperture of the scope in the ‘Aperture’ box in mm.
- Click the ‘Calculate’ button and the ‘currently selected reticule will be updated to show the calculated field of view.
Chip Size Calculator: Displays a form which enables you to calculate the field of view based on the size of the camera sensor. Some manufacturers of DSLR cameras may provide sensor sizes but no information about pixel sizes.
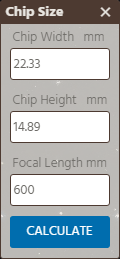
- Enter the width and height of the camera sensor in the ‘Chip Width’ and ‘Height’ boxes. (For the most accurate results, only include the active imaging area, leaving out any optical black area if possible).
- Enter the effective focal length of your camera or lens in the ‘Focal Length’ box in mm. You should include the effect of any Barlow or Reducer by multiplying the focal length of the scope by the magnification/reduction factor .
- Click the ‘Calculate’ button and the ‘currently selected reticule will be updated to show the calculated field of view.
- Generally you should get the same results using either the of the two calculators, but in some cases the camera manufacturer’s specifications for chip size, pixel size and resolution don’t match, usually due to the optical black areas being included in the sensor size, but not the image resolution..
- Note that when the Chip Calculator is sued, the reticule cannot be annotated with the horizontal/vertical pixel scales and the scope/lens resolving power as the information required to do so is not available.
Compare: Displays a form which enables you to create and compare multiple reticules.
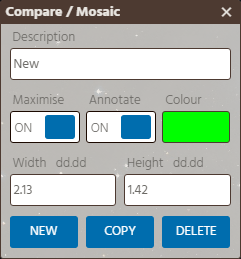
- Change the description of the current reticule by entering it in the ‘Description’ box and hitting Enter. The description will be displayed at the bottom right of the reticule. Note that the description can contain a maximum of 20 characters.
- Use the ‘Maximise’ control to make the currently selected reticule as large as possible on screen. Note that if a reticule is maximised, you cannot zoom the survey in or out whilst it is the currently selected one.
- Use the ‘Annotate’ control to display the reticule’s size in degrees, pixel scale and resolving power.
- Use the ‘Colour’ control to change the colour of the reticule by clicking on the coloured box to display an interactive colour picker.
- To manually adjust the size of the current reticule, enter values in the ‘Width’ and ‘Height’ boxes in decimal degrees and the reticle will re-size to match.
- The ‘New’ button creates a new reticule with the default values and makes it the current reticule.
- The ‘Copy’ button creates a copy of the current reticule and makes it the current one.
- Once you have created a new reticule using ‘New’ or ‘Copy’ you can then use the ‘Equipment’ form or one of the calculators to change its size. This enables you to compare different cameras and telescopes on the same target.
- By using the ‘Copy’ button to create multiple reticules, you can position them using the pan and rotation controls in order to plan out a mosaic.
- The ‘Delete’ button deletes the currently selected reticule. If this is the only reticule, a new reticule is automatically created and displayed with the default settings.
Search: Displays a form which enables you to locate any deep sky target.
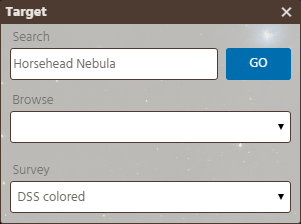
- Enter a target name or catalogue number in the ‘Search’ box and hit ‘Go’ If a match is found, the survey will update to display it. You may use the common name of an object, e.g. Horsehead Nebula or the catalogue number, e.g. M51, IC3393 or NGC393. The search uses the CDS Sesame name resolver service and should be able to locate most deep sky objects.
- Alternatively, you can choose a popular object from the ‘Browse’ list which contains all Messier and Caldwell objects.
- The ‘Survey’ list enables you to select from a list of deep sky surveys supported by Aladin Lite. The default DSS survey is probably the most useful. Note that some surveys only cover (very small) parts of the sky, so if you don’t see anything, try zooming out.
Coordinates: Displays a form which enables you to find a target using coordinates, or to retrieve the coordinates of the centre of the field of view.
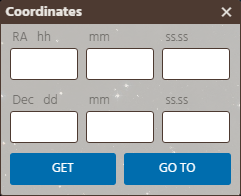
- If you know the Right Ascension and Declination of an object (J2000 epoch) enter them and click ‘Go To’ to move the centre of the field of view to that location.
- You may enter RA in degrees, minutes and seconds format in the ‘RA Hours/Degrees’, ‘Minutes’ and ‘Seconds’ boxes and Dec in the ‘Dec Degrees’, ‘Minutes’ and ‘Seconds’ boxes.
- Alternatively you can enter RA and Dec in decimal degrees format in the ‘RA Hours/Degrees’ and ‘Dec Degrees’ boxes and have the toolbox attempt to convert from to degrees to hours/degrees, minutes and seconds. If so you must leave the ‘Minutes’ and ‘Seconds’ boxes blank .
- You can click the ‘Get’ button at any time to retrieve the current coordinates of the centre of the field of view.
Share and Save: Displays a form which enables you to create a permanent link to the current reticule, and to save the current set of reticules.
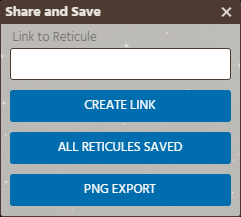
- To share a single reticule with others, find your target and display the current field of view reticule as you wish to share it.
- Click the ‘Create Link’ button and a link will be generated in the ‘Link’ box.
- Select the entire link and copy it to create a bookmark, share it or post it to a forum. When you use the link, the imaging toolbox will be displayed with the existing settings. Note that the link box only updates when you click ‘Create Link’.
- To save all reticules, click the ‘Save Reticules’ button. The entire set of reticules will be saved to your browser and re-loaded automatically when you next view the Imaging Toolbox. If the current set of reticules is unchanged since the last save, the button will display ‘All Reticules Saved’. Note that the reticules are saved to the current device and browser only and will overwrite all previously saved reticules.
- Click the ‘PNG Export’ button to export the current view to a PNG file. An image lightbox will pop up. Use the download button (top left) to save a copy of the image automatically (typically named download.png, download(1).png, etc.) and saved in your browser’s default download location. Click the close box (top right) to return to the Imaging Toolbox. Note that these images are temporary and can’t be shared/uploaded directly. Save them to your local device and then upload to a photo sharing site, social media or a forum.
Limitations
The Imaging Toolbox has a number of limitations of which you should be aware:
- The Imaging Toolbox cannot determine whether you can reach focus with a given combination of equipment, nor can it determine whether your scope will produce a flat field or a fully illuminated one across the width of a given camera sensor.
- You should conduct further research before committing to an expensive purchase, and no warranties are given or implied as to the accuracy of results or fitness for any particular purpose.
- The fields of view displayed are approximations only and may not match your equipment’s field of view precisely. The projections used in the survey work reasonably well for smaller fields of view of a few degrees typical of an amateur camera and telescope).
- The projection method breaks down for larger fields of view and thus zooming is limited to a maximum of 90 degrees when a reticule is displayed. Note that it is possible to create reticules that span more than 90 degrees but these cannot be accommodated on screen as the extreme distortions due to projection would not necessarily replicate the true image captured on the camera sensor.
Compatibility
Browser: The Imaging Toolbox requires a modern web browser and may not work (well) in outdated ones.
Devices: The Imaging Toolbox can be used on devices from smartphones, through tablets to desktop PCs. There is support for touch devices.
Plug-ins: JavaScript must be enabled in your browser, but you don’t need any additional plug-ins or extensions.
Release Notes
V1.6 – April 2021
- Fixed a race condition in loading and execution of scripts which could cause the controls to be unresponsive if the page loads very quickly (e.g. from cached files in some browsers such as FireFox).
V1.5 – April 2021
- Updated for new web site design.
- Added a dismissable donate form.
- Changed export to PNG to use a hideable div and img as tab/iframe method not working any more due to browser security model changes.
V1.4 – September 2020
- Reverted to using https again as Aladin Lite now supports it
V1.3 – October 2019
- Fixed constellation and RA/Dec Lines not drawing correct thickness, colour or at all on Chrome.
- Fixed constellation sources getting ‘stuck’ when zoomed right out. Seems to be fixed in new Aladin Lite update.
V1.2 – November 2017
- Had to revert use of https back to http due to CDS not supporting it suddenly!
V1.1 – October 2017
- Migrated to https, fixed problems with insecure script loading.
- Fixed export to PNG as was not working due to Chrome no longer allowing top level data URLS for security reasons.
- Migrated site over to https as now supported by CDS servers/
V1.0 – January 2017
- New responsive layout supporting any screen size and touch-friendly design.
- New colour picker for reticules.
- Constellation lines and names display.
- Equatorial grid display.
- Messier and Caldwell object location display.
V0.8b – July 2016
- Internal changes to hosting model and provider.
V0.7b – February 2014
- Third beta release.
- 604 telescope brand/models.
- 407 camera models.
- New in Aladin Lite:
- Now using Aladin Lite V2.
- Updated available surveys:
- Default survey is now main version of DSS Colour; any existing links referencing a removed survey will default to this.
- Backup DSS survey removed from options for simplicity.
- SDSS7 survey replaced with SDSS9 survey.
- New VTSS-Ha survey added.
- Better control of zooming/locking the field of view:
- Eliminated “bouncing” at maximum FOV.
- Elimated ineffcient redrawing to force a particular FOV when reticle maximised.
- Export view to PNG button added.
- New Features:
- Split in to separate HTML, CSS and JS files for performance and ease of maintenance:
- Can now add/change cameras and scopes without having to do a version release.
- Using arctan instead of small angle approximation to calculate reticule sizes.
- More accurate for big chips/short focal lengths, thus may result in *slightly* different results.
- The ‘Link’ box under ‘Share and Save’ automatically selects the whole URL text when clicked.
- Bug Fixes:
- None.
- Known Issues:
- Sometimes the toolbox will only partially initialise. The Aladin Lite survey, etc. will display and function as expected but the form controls for creating and managing reticules, etc. will not respond to clicks. This is being investigated; re-loading of the page usually clears the issue (sometimes it may be necessary to reload several times).
- The Aladin Lite Sinus projection is used by default. This can result in some distortion of the survey background when zooming at different scales, especially close to the celestial poles.
- Zooming limits only work if the current reticule is displayed, i.e. if other reticules are displayed but the current one is not, it is possible to zoom wider than 90 degrees, which may lead to erroneous display of the field of view in the other reticules at such large scales.
V0.6b – July 2013
- Second beta release.
- 588 telescope brand/models.
- 383 camera models.
- New in Aladin Lite:
- Zoom in/out buttons.
- New Features:
- Experimental support for tablets/smartphones, Aladin Lite display re-sizes to fit narrower screens.
- Redesigned forms, better browser compatibility and flexible layout for mobile devices.
- Removed ‘Simple Forms’ option as hopefully no longer required due to new forms layout.
- Create and name multiple reticules and compare them on screen simultaneously.
- Label each reticule with a description.
- Save/load current set of reticules to browser local storage.
- Display and offset multiple reticules to plan a mosaic.
- Refactored code, more object orientation, doubtless new bugs to find.
- Bug Fixes:
- Limit Aladin Lite zoom to 90 degrees when a reticule is displayed to minimise scaling/projection issues.
- Known Issues:
- The Aladin Lite Sinus projection is used by default. This can result in some distortion of the survey background when zooming at different scales, especially close to the celestial poles.
- Zooming limits only work if the current reticule is displayed, i.e. if other reticules are displayed but the current one is not, it is possible to zoom wider than 90 degrees, which may lead to erroneous display of the field of view in the other reticules at such large scales.
V0.5b – June 2013
- First beta release.
- 588 telescope brand/models.
- 382 camera models.
Acknowledgements
The Imaging Toolbox is powered by Aladin Lite, developed and released by the CDS (Centre de Données astronomiques de Strasbourg).
Constellation outlines are those used in VirtualSky, developed and released by Las Cumbres Observatory.
All trademarks are acknowledged.